Setting up your email account on your device is easy to do. All you need is your email address, password, and validation of multi-factor authentication.
Before you begin following the steps below, we recommend logging into your Microsoft account
on the web to verify the login information you have is correct. If you are unable to sign-in or need further assistance, please create a support request by
clicking here.
Windows PC
For the best compatibility and experience, we recommend using the latest version of the Microsoft Outlook app. If you do not have Outlook or prefer using another method to access your emails, please contact our team for assistance.
- Open the Outlook app, click on the "File" menu, and choose "Add Account" towards the top.
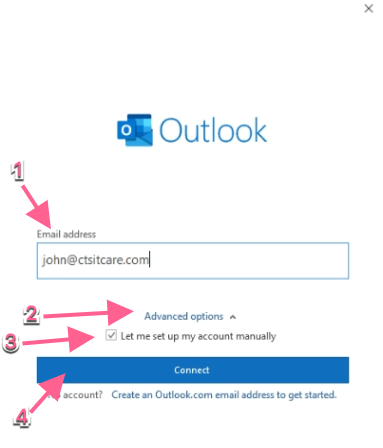
- Outlook will prompt you with a pop-up window as shown below. Enter your email address and click on "Advanced Options". Then, check "Let me set up my account manually" and click on "Connect".
- From the following window, click on "Microsoft 365". This will prompt you with the Microsoft login page. Enter your password and click "Sign in".
- The next window (as shown below) will display the last 2 digits of your cellular number on file. Click on the "Text +XXXX...." to receive your 2FA code.

- Once the SMS is received, enter it in the next window and click "Verify".
- In the next window, you can uncheck "Allow my organization to manage my device" and click "OK". Click "Done" on the next window.
- On the final window (shown below), leave "Use Cashed Exchange Mode....." checked. The slider underneath will default to 1 year, which means only your last 12 months of emails will be downloaded to your computer. This will help preserve storage space on your PC and keep your Outlook running at its best. If you often find yourself referring to older emails, you may adjust the slider to cache emails further back. Once you make your selection, click "Next". There will be one more window to confirm your account has been successfully added. Click on "Done" to complete the process.

MAC Computer
For the best compatibility and experience, we recommend using the latest version of Microsoft Outlook for MAC application. If you do not have Outlook or prefer using another method to access your emails, please contact our team for assistance.
- Start the Outlook app and click on the "Outlook" dropdown located on the menu bar (top of your screen next to the Apple logo). From the drop down, choose "Preferences".
- Outlook will prompt you with the "Outlook Preferences" window. Click on "Accounts" then click on the "+" located towards the bottom left, and choose "New account" as shown on the screenshot below.

- Outlook will prompt you with the "Add Account" window. Enter your email address, then click "Continue".
- Depending on the current domain configuration, you will be prompted with one of the two windows below. If prompted with "Window - A" please skip step #5 of this guide and continue with step #6.

- If prompted with "Window - B", select "Not Google?" at the top right corner of the window (indicated with the arrow above). This will prompt list of configuration options. From there, choose "Office 365".
- Enter your email password on the following window and click "Sign in".
- The next window as shown below will display the last 2 digits of your cellular number on file. Click on the "Text +XXXX...." to receive your 2FA code.
- Once the SMS is received, enter it on the next window and click on "Verify".
- On the final window, click "Done" to complete adding your account.
iPhone / iPad
For the best compatibility and experience, we recommend using the Microsoft Outlook app on iOS devices. Please go to the iOS App Store to download it for free before getting started. If you prefer using another method to access your emails, please contact our team for assistance.
- If you already have Outlook setup on your device with another email account, tap "Inbox". Then, tap on the envelope with the "+" sign on the left bar (shown on the screenshots below). Next, choose "Add Email Account" from the options. If you just installed the Outook App, please open it and proceed to the next step.

- You will be prompted to enter your email address as shown on the screenshot below. Enter your email address and tap "Add Account".

- If you are not prompted with the "Sign 'in with Google" page as shown below, please skip this step. If you are prompted with the page shown below, tap "Done" on the top left corner, then "Set Up Account Manually". Next, select the "Office 365" option. Enter your email address on the following page and tap "Next".

- Enter your email password and tap "Sign in".
- The next window (as shown below) will display the last 2 digits of your cellular number on file. Click on the "Text +XXXX...." to receive your 2FA code.

- Once the SMS is received, enter it on the next window, then click on "Verify".
iOS Mail App
Instructions below are provided for iOS 15. If you have a device with an older or a newer version of iOS, some steps may be slightly different then those provided below.
- On your iOS device, go to "Settings" then tap on "Mail" followed by "Accounts".
- Tap on "Add Account".
- From the list as shown below, choose "Microsoft Exchange".

- On the next window, enter your email address in the both "Email", and the "Description" field, then tap "Next".

- iOS will prompt you with two options, choose "Sign In".

- Enter your email password, and tap "Sign in".

- The next window as shown below will display the last 2 digits of your cellular number on file. Click on the "Text +XXXX...." to receive your 2FA code.
- Once the SMS is received, enter it on the next window, then click on "Verify".
- You will briefly see checkmarks next to the the account, followed by the sync selection options as shown below. Most iOS users setup their contacts, calendars, reminders, and notes to sync with a cloud service such as iCloud when they first setup their phone. Syncing this information with multiple providers can cause issues such as duplicates. Unless you're familiar with your setup, we suggest enabling "Mail" option only as shown below

Android
For the best compatibility and experience, we recommend using the Microsoft Outlook app on iOS devices. Please go to the iOS App Store to download it for free before getting started. If you like to use iOS Mail app, you can also find instructions on configuring it further down on this page. If you prefer using another method to access your emails, please contact our team for assistance.
- If you already have Outlook setup on your device for another email account, tap "Inbox". From there, tap on the envelope with the "+" sign on the left bar as shown on the screenshots below. Next, choose "Add Email Account" from the options. If you just installed the Outook App for the first time, please open it and proceed to the next step.
- You will be prompted to enter your email address as shown on the screenshot below. Enter your email address and tap "Continue".

- If you are not prompted with the "Sign in with Google" page (shown below), please skip this step. If you are prompted with the page, tap "Not Google?" at the bottom and then tap "Set Up Account Manually". Next, select the "Office 365" option and enter your email address on the following page. From there, tap "Next".

- Enter your email password and tap "Sign in".
- The next window as shown below will display the last 2 digits of your cellular number on file. Click on the "Text +XXXX...." to receive your 2FA code.
- Once you receive the SMS, enter it on the next window, then click on "Verify".
